ユーザーにNotionへのアクセスを許可してもらいたいときに利用する、OAuth認証の実装方法です。
全体の流れ
ざっくりこのような流れになります。🟨はユーザー操作です。

1. リダイレクト先のページを作成
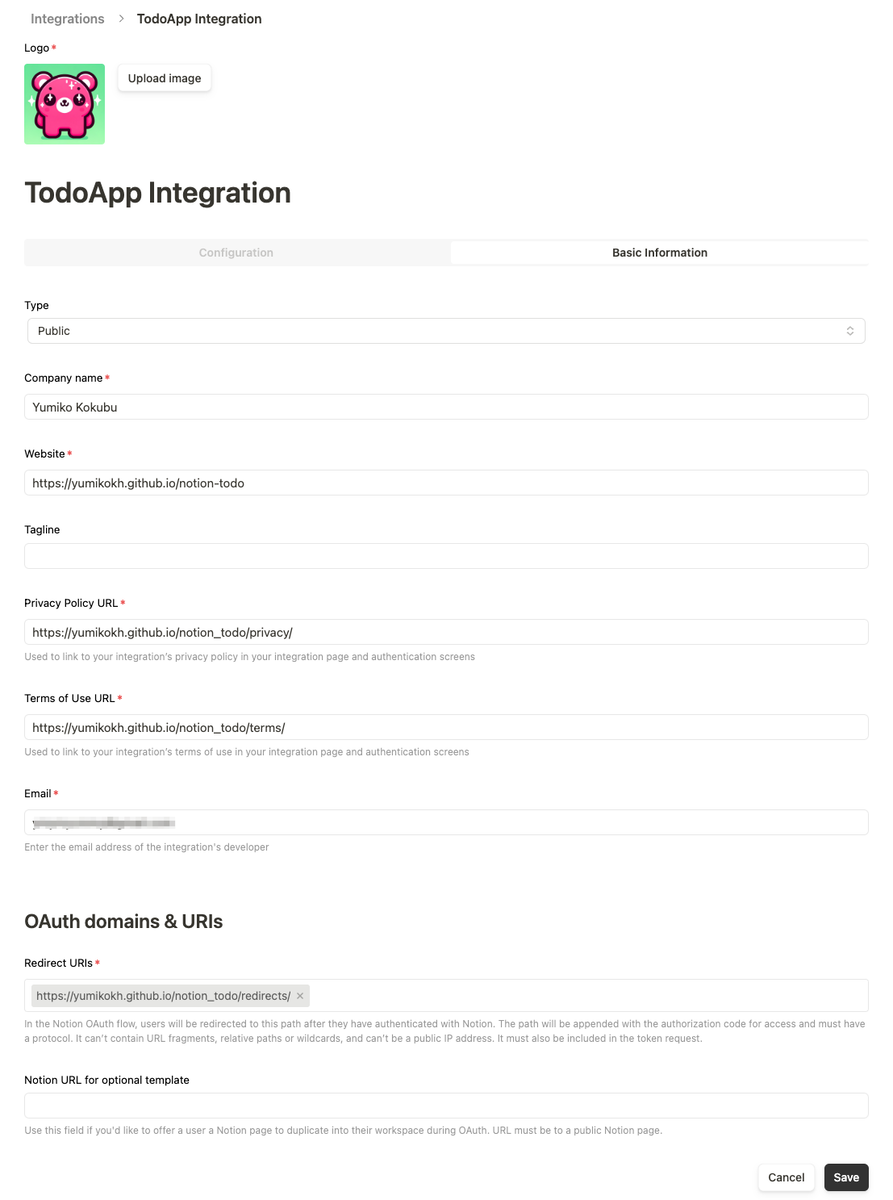
2のPublic Integrationを作成するときに必要なページを最低3種類用意します。
- Privacy Policy
- Integrationページと認証画面でプライバシーポリシーにリンクするために使用されます
- Terms of Use
- Integrationページと認証画面で利用規約にリンクするために使用されます
- Redirect URI
- 認証後に受け取る
codeをパラメータとして受取り、アプリへリダイレクトさせるために使用されます
- 認証後に受け取る
- Fallback (Optional)
- 認証時に失敗したときに表示するページです
上の2つはいったん中身は仮でURLだけあればOKですが、RedirectURIはNotion認証から受け取った code をパラメータに含んだ状態でアプリへリダイレクトさせる実装が必要です。(ちなみに私はGithubページで作成しました。)
実装例
<!DOCTYPE html>
<html lang="en">
  <head>
    <meta charset="UTF-8" />
    <meta name="viewport" content="width=device-width, initial-scale=1.0" />
    <meta name="robots" content="noindex" />
    <title>Notion-Todo Redirects</title>
  </head>
  <body>
    <script>
      var urlParams = new URLSearchParams(window.location.search);
      var code = urlParams.get("code");
      if (code == null) {
        window.location.replace({FallbackページURL});
      } else {
        window.location.replace("notiontodo://oauth/callback?code=" + code);
      }
    </script>
  </body>
</html>
notiontodo は、3で設定するUrlSchemeなので、適宜変更してください。
2. Public Integrationの作成
こちらから新しいIntegrationを作成します。
「Type」は Public を選択し、1で作成したURLを使って必須項目を埋めていきます。

作成に成功すると、 設定画面から利用可能な OAuth Client ID, OAuth Client Secret, Authorization URL が取得できます。
3. アプリ側の実装
flutterでの実装例です。
- NotionIntegrationで取得する
Authorization URLへ遷移します。UrlSchemeもここで指定します。- 今回は flutter_web_auth_2 packageを利用
https://api.notion.com/v1/oauth/tokenへPOSTリクエストを行いtokenを取得します
import 'dart:async';
import 'dart:convert';
import 'package:http/http.dart' as http;
import 'package:flutter_web_auth_2/flutter_web_auth_2.dart';


class NotionOAuthRepository {
  final String notionAuthUrl;
  final String clientId;
  final String clientSecret;
  final String redirectUri;

  NotionOAuthRepository(
      this.notionAuthUrl, this.clientId, this.clientSecret, this.redirectUri);

  Future<String?> fetchAccessToken() async {
    try {
      final result = await FlutterWebAuth2.authenticate(
          url: notionAuthUrl, callbackUrlScheme: "notiontodo");
      final code = Uri.parse(result).queryParameters['code'];

      if (code != null) {
        final encoded = base64.encode(utf8.encode('$clientId:$clientSecret'));
        final res = await http.post(
          Uri.parse('https://api.notion.com/v1/oauth/token'),
          headers: {
            'Content-Type': 'application/json',
            'Authorization': 'Basic $encoded',
          },
          body: jsonEncode({
            'grant_type': 'authorization_code',
            'code': code,
            'redirect_uri': redirectUri,
          }),
        );
        final data = jsonDecode(res.body);
        return data['access_token'];
      } else {
        throw Exception('oAuth Code is null');
      }
    } catch (e) {
      print('Failed to fetch access token: $e');
      return null;
    }
  }
}
取得したtokenをAuthorization: Bearer {token} としてヘッダーに付与することでNotionAPIを利用することができます。